Showing posts with label Projects. Show all posts

Saturday, January 14, 2012

It's About Time...Right?!

I've only been mentioning it since about July, so here it is. My 2011-2012 school year theme:
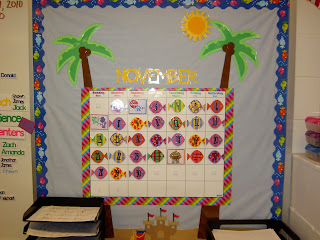
Hey, now you're all All-Star...Not just all-stars at sports, but also all-star readers, writers, mathematicians, historians, and scientists. I tried to incorporate academics with their favorite sports.

Yes, it was partially inspired by the Smash Mouth song, thanks to Shrek. But my motivation was to make something gender neutral that would inspire and appease ALL the boys in my room. I am pleased to say I did just that!It turned out even better than I planned. I sketched it out one day in a meeting, fearful I might not be able to bring to justice my idea. But I actually think I may have out done myself!

Here is my calendar:
Each month's name is cut in colors that remind you of the season, holiday, or general feel of that month. I used the Varisity Cricut Lite cartridge for the months and lettering of the "Hey, now..."
sign. Each of the different sports balls were cut from the Sports Mania cartridge, using the Designer Calendar cartridge for the numbers. All holiday, birthday, and extra cards were cut from the Designer Calendar cartridge as well.

Here is a close up of the welcome sign that hangs in the 10 foot hallway you pass through to enter my room.
Most of the details were cut from the Sports Mania cartridge, with a few additional elements coming from the Basketball, Everyday Paperdoll, and All Sports (for the All-Star writing) cartridges.

I also added a star (see the first picture) with each student's picture cut in silhouette (rectangular pics didn't look good) and name. I printed their names in a Varsity font (I found free online) on clear labels and placed under each individual pic. The students love seeing their pics on the wall. They were anxious when we received a new student for his pic to be added to the All-Star wall.

Next up, my birthday wall...

Thursday, January 12, 2012

Winter Craft...

I wanted to do something fun this year for my students to give as a 'holiday' (CHRISTMAS) gift to their parents. My cute mother-in-law gave us a subscription to Family Fun magazine and it has come in handy on more than one occasion...this was no exception. As I thumbed through it I found this.

I started drinking all the Vitamin Water I could stand and collecting my son's Gatorade bottles so the kids could make these adorable snowmen:I made these samples with the help of my daughters to show the students what they would be making. I also wanted to see what sort of difficulties little fingers would encounter. My girls had no problem, but students with sensory issues did run into a problem or two.

The basic process is like paper mache, using tissue paper and Elmer's glue mixed with water. Some of them had little trouble at all, others needed some help getting started. A few got bored halfway through and wanted to stop, while others were having a hayday getting dirty and sticky. Then there was my favorite response. One of my little friends took one look at the demonstration and said, "That is disturbing, I'm not touching that." So I came up with a compromise, I smeared the glue and he placed the paper.

All in all, they turned out well. Check out the individuality of each snowman, just like my friends...UNIQUE!

Wednesday, January 4, 2012

New Year's Projects...

When we moved into our house over 3 years ago the walls were all contractor white. Slowly, we moved through the house room by room adding color. I have documented the Cricut use previously here, in the girls room. My intent was to add a vinyl quote to their room to complete the look. First I needed just the right quote. The search took some time and I can't even take the credit for the 'perfect' quote. The credit goes to my mom who found a quote that will grow with the happy, beautiful girls who grace our home with love and laughter.

So here's the finished product:
I used the Doodletype cartridge for the print and Cursive 101 'prettiest.' I think it turned out okay. If was my first vinyl project of this size and took some work, but overall, it turned out well if I do say so myself.

To see my other project...I will be posting it on my private blog (click here). If you are interested, please post a comment and I will send you an invite.

Next on my list of to-dos:
1. Post the super cute classroom craft we made before break
2. Post my theme for the 2011-2012 school year (now that the year if officially half over)
3. Send out invites for the private blog. I apologize to everyone and anyone who has not received one. I didn't send them out due to a little trial life threw my way between Thanksgiving and Christmas' breaks. Nothing to be concerned about, just consumed a great deal of my time. I'm hoping 2012 will be a little less chaotic! :)

Wednesday, July 6, 2011

Menu Cards...

For years I have made out a weekly calendar of meals, noting ingredients to add to my weekly shopping list. I know it has saved me money and trips to the store each week. Over the years, I have used computer generated calendars, but most recently this:
It's worked for us. My only two complaints would be: 1-the dry erase markers do not fully erase leaving colored smears on the board and 2-coming up with ideas for the meals.

This spring I found something that would take care of both of these issues. But I knew I would need time over the summer to make it happen. So I sat down 2 weeks ago and typed these up. The next day I printed, laminated, cut, and placed magnets on the back of all 46 of them, including two blanks, for meals out and new recipes. Now all I have to do is sort through the cards and place them on the board. Less thinking, easy planning, and cute to boot!

Here they are:
The great thing is, I can easily make more cards as new favorites come along because they were generated through a PDF file. I was going to provide the link, but as of now, I can't access the site. But in order to give credit where credit is due, I was able to download them from:

www.blog.myheartandhome.com

One of the fabulously talented ladies who contributes to this blog, generated these adorable cards you can type right on. Warning: when you open them, a large white text box appears, the box does NOT print.

I plan to check back to be able to provide the link, otherwise leave a comment with your email address and I would be happy to share!

The one problem I have encountered with these is the flack I take if I don't serve everything indicated on the card. No need to fear I am already 'Cricutting' a disclaimer regarding how all meals are subject to change at the discretion of the cook.

Monday, May 30, 2011

Weekend Crafting...

This weekend we were confined by rain and void of baseball. The cute hubby and I continuously remarked, "It's only such and such time? Wow!" Though we both appreciated the change of pace and the ability to browse rather than fly through a store, I felt a little awkward. I can't remember the last time I didn't have an hundred things (that might be a slight exaggeration) weighting down on me. So I found a little something to keep me busy and continue with the theme of enjoying a little down time...CRAFTING!!

To the cute hubby it has the appearance of one more thing I have to do. He doesn't have a full understanding of how therapeutic it can be. Plus there is always the added bonus of admiring the finished product.

I had been feeling a little guilty because I've been so caught up in life I didn't take the time to shower my kids' teachers with appreciation as I've done in the past. So it was time to redeem myself. This project is one of my favorites, so much so, I couldn't resist the temptation to make one for myself this go around.

Two Christmases ago I made these for my kids' teachers and decided I would make it a yearly tradition. I thought it would be fun to show my kids' trail through the elementary school. Unfortunately, last year when I set out to purchase the needed slates I couldn't find them. Well, the wonderful world of the great wide web came through for me and I was finally able to secure a few (or 10...you know, just in case).

Here goes:
Gather the desired number of slates and flowers, as well as corresponding ribbon and paint. You will also need some tacky glue (I use Aileen's), a drill, polyurethane finish, paint brushes, sandpaper, vinyl, and of course something to cut that vinyl with, like a Cricut.
Here is an example I will use to show the project from start to finish.Tape the inside edge of the slate and sand the outside edges.
Paint the slate's frame. Some colors need only 2 coats, others, like the pink, need 3. I also paint a quick coat on the back to finish it.
Then it's time to protect the paint and ensure it doesn't rub off on other things. Apply a quick coat of polyurethane. I prefer to use Cermacoat's varnish. However I was committed to using only what I had in the house this go round. This works in a pinch, but takes longer to dry. And the cute hubby might just take your brush in the midst to do a quick touch up here and there around the house. :)
The next step is to mark the holes for the cute hubby to drill. Two years ago I did the drilling myself, this year I let the hubby do the honors with is new birthday toy. I find the top, center of the frame and mark it with a pencil for the flower. I also place marks 1 1/2 inches from either end to tie in the ribbon used for hanging the slate. The drill bits vary depending on the flower, but I use a small one for the ribbon (I wish I had made note of the size, sorry).
Measure 21 inches of ribbon. Slide one end through one of the side holes. Tie it off in back with a double knot. Slide the other end through the other side hole. Tie it off with a double knot.
Measure and cut two 6 inch strips. These will be glued onto the top of the frame beginning about one inch from the center hole. Glue it over the top of the other ribbon (used to hang the slate) to the end of the frame. Once it has dried, flip it over, put a drop of glue on the side and glue the remainder of the strip down on the backside. I like to glue down the excess from the knot and then glue the strips that have wrapped around from the front over the top of the excess. I use wire cutters to cut the stem off my flower so there is about a third of an inch left of the stem. I dip what's left of the stem in the glue bottle and then place it in the large, center hole.
Now it's time for the vinyl. Type in the desired name into the Design Studio software. This makes it easier to manipulate the lettering and spacing. Plus you can intermix fonts if necessary. For this go round I used 'Making the Grade' for all the lettering and "All Mixed Up" for the apostrophe and asterik placed to abbreviate Mrs.
Cut the vinyl using the software and Cricut.
Peel off the excess vinyl, leaving the desired printing on the backing.
Apply the transfer tape. Burnish with a popsicle stick, brayer, or credit card to be sure the vinyl sticks to the tape and will come off the backing when the tape is pulled up.
Position the transfer tape onto the slate as desired. Burnish in order to transfer the lettering to the slate. Viola, the finished project!
Here are a few more, including 2 void of vinyl. Sometimes I get a little carried away when I find the time to play. I'm sure I'll find a use for them. I'm thinking they might make cute birthday gifts for ALL the birthday parties the girls get invited to! Check 'em out!
The frame of this one is actually blue, but didn't photograph well. Also, I go back and forth on whether the flower is too large. I think I've looked it so long I've come to terms with it.

Wednesday, December 22, 2010

Teacher Gifts

Teacher gifts are always a struggle each year. I want to make sure I am giving gifts that show our level of appreciation and are meaningful at the same time. Two years ago I came up with what I thought was the perfect gift and had glorious visions of making them each year, leaving a physical track of my children's trek through the elementary school. Only to gave the vision squashed as I went to purchase the necessary supplies last fall. I do have plans to do a little research and make them for teacher appreciation in the spring, still leaving our mark! :)

Instead I tweaked an idea my mom shared with me last winter. So I made these cute gift card holding cards. I used the Christmas Cheer cartridge to cut the Santa and the list out. The rest is ribbon from Walmart and paper from one of my favorite places (the dollar bins at Target).
The inside of the card, had to of course rhyme. It is a little hard to read, so it says: "He's made his list and checked it twic, Your name topped the list as nice! Merry Christmas." Then I had each of my kids sign their respective teacher's cards. Then a gift card was tucked inside the ribbon.

I also included a little treat for the elementary teachers. Here's a little warning to all you teachers out there...your students notice your little treats! I asked my girls what their teacher's favorite treat was and they easily told me a 3 Musketeers bar - mint. When I asked the 5th grader he said, "Mrs. Smith doesn't really eat treats, but she LOVES Diet Coke. Like seriously, Mom. I mean she LOVES it. She drinks like four a day." To which the girls added that their teacher likes Diet Pepsi. So I filled gift bags with the appropriate soda and threw the tissue paper wrapped card on the top. Hopefully they know they are appreciated!

Tuesday, November 30, 2010

Somewhere in the Sun...

It is every teacher's job to transform 4 white walls into an environment in which students can spend a minimum of 6.5 hours per day. Bright colors, word walls, math facts, vocabulary, bulletin boards, calendars, etc. Whatever it takes to stimulate young minds. Over the course of my employment, I have worked in 4 different schools. Only one school provided me a room with a window. The others have 'boxed' me. On any given day I couldn't tell you whether the sun was shining, rain or snow fell, or if the cool wind blew. Truthfully, I don't notice it on most days until I walk out of the building and think "uh, it snowed" or "wow, what a beautiful day." But there are those days when I long for a look into the outside world. Since I know a sky-light is out of the question, I had to find a way to invite the outside world into my room. So I decided to go with a beach theme. Bring the sunshine inside...even if it is made of cardstock and lamination. ;)
It started with the welcome sign I posted earlier. Then I decided to make my own calendar. It was far more work than I anticipated, but I do have to say I have the cutest calendar in the building.
I used the Life is a Beach cartridge to cut all of the pieces except for the sun and the palm tree trunks. The tree trunks were done by hand and the sun was cut using Going Places. The fish I used for the dates were altered using Design Studio. The actual fish are longer, thinner fish. I needed to fatten them up some to fill up the calendar squares. I couldn't resist, I had to bring them to life with googley eyes. The months of the year were cut from the Life is a Beach font and 'welded' together using Design Studio. The numbers, holidays, and special occasion cards were cut using Designer's Calendar. I thought I could quickly cut each of those out in 2 hours time. 4 hours later I was still cutting and pasting...but it turned out cuter than I anticipated.
I am including both November and December so you can see some of the different elements.

I did laminate all of the pieces and put velcro on the back to make for easy changes from month to month. I do wish I had laminated the calendar poster board before putting the velcro on it. It is not quite as sturdy as I would like. But works none the less.
I bought the fish border and calendar posterboard at my local teacher supply store. I used material for the background (less fading) and sandpaper for the bottom border.

Monday, November 29, 2010

It's all about the Schedule...

This blog pays tribute to the working mom...who not only works a full day outside the home managing any number of tasks but returns home to more demands. I have been home less than 3 hours and in that time have: helped 2 second graders with math homework, cleaned out their folders, and listened to them each read, changed the linens on my bed, picked up my 7th grader from basketball practice, made and served a homemade meal, put the lights and ribbon garland on my Christmas tree, supervised chores, and am now on my 4th load of laundry. I am exhausted to say the least. But bed time for the kids is at least an hour away. In that time we will decorate the tree, welcome Dad home from a long day's work, brush teeth, say prayers, and listen to at least 20 different attempts to avoid actually getting in bed. All in a day's work right? The great thing is, I will do it all again tomorrow, varying slightly. Somehow amongst all the chaos there is happiness, laughter, and love!!

It's interesting how my work life often mirrors my home life. I am constantly running in about 3 different directions at any given time, attempting to be everything to everyone, and managing to get things done in the midst of it all. One thing that helps me in my classroom is my picture schedule. This is something I developed last year.

My classroom is a self-contained special education room for 3rd-5th grade students with mild/moderate disabilities, ranging from learning disabilities to autism to mild cognitive impairments. I am responsible for delivering each grade level's core instruction to each student. We are very busy and every minute is scheduled to the fullest.

To help my students anticipate and prepare for what our day will look like I made the schedule below. It helps them see everything from subject matter to their special classes (art, health, PE, and music) to the related services they receive.

I used the Learning Curve cartridge to cut all lettering. I 'welded' all words together using the Design Studio software. It is all cut and attached to cardstock, laminated, and magnetized. (I purchased magnet strips at Walmart and my local hardware store.) I made 3 name magnets per student, as well as magnets with various times on them.

The math symbols were all cut from the Learning Curve cartridge. The open book was cut using the Cursive Cartridge and the pencil was cut from My Community.

Both the globe and the beaker were cut using the Curisve cartridge.


The earphones were cut from the My Community cartridge. I used the Cursive cartridge to cut the computer and the pencil is from Locker Talk.

At the time I made my schedule, I didn't have access to all of the cartridges I do now, so I used some clipart. All clipart is courtesy of Microsoft.

I used My Community to cut the police officer. The fire truck was cut using the Everyday Paper Doll cartridge. "Drill" is one I added this year because we have either a fire, tornado, lockdown, or evacuation drill once a month. Since my little friends need warning to ease their anxiety over the drills, it serves as a reminder for me to talk to them about the upcoming drill and helps them know where it will fit into our day.


All of the extras: the bookstack, clef (music - I hope that's right??!!), and brushes were cut using the Cursive cartridge.
The clipart is again curtesy of Microsoft. All the balls were cut using Sports Mania.
Locker Talk was used to cut the grade level signs. I cut these because I teach math 3 times a day and lunches vary. This way the students know by the color and wording what applies to them. I mentioned before that everything is color coded. That goes for subjects and grade levels. 3rd grade is green, 4th grade red, and 5th grade is blue.
I am planning, but haven't yet gotten to, making picture day and assembly pieces. They will come...one day.
I also had a "one of these things is not like the others" moment when I was looking at the first picture. After the birthday cupcake wall I mentioned, my next project may be magnetized dates to coordinate with the picture schedule...more to come on that one.